Landscape

A Day for Fine Art Photography

Today was a perfect example of what production in Fine Art Photography entails. The image enhancement does not stop at the final digital optimization for the web. I don't simply upload an image to a mass production printer and let them print the image on whatever paper using whatever profile they wish.

Today I spent hours optimizing the "Atlantic Morning" print for an upcoming art show. I was very happy with the image on the screen and the first proof prints looked fine at 8x10 and even the 11x14. Then came the 28x16 attempt and something was definitely lacking. Normally my images expand and become even more alive in larger prints, especially on the Canson Baryta Photographique paper. This particular paper has a luster finish which is more like a glossy than a mat paper.

Atlantic MorningBut there were some printing irregularities that were showing up as well as the color fidelity just wasn't there. I have seen these printing irregularities before on luster types of paper, in particular with images that have large smooth areas of fairly bright tones. It is mainly a function of the ink simply not going on the luster paper in a uniform fashion and there can be very subtle thick bands. Not like the original banding from the ancient inkjet days, but thick variations in luminosity that can only just barely be picked up by the eye at certain angles. This is a very rare event, but it does happen and fortunately through experience I know how to handle it. So after optimizing and evaluating the print as much as I could for the given luster paper profile, I decided to move onto my classic standby paper, Hahnemuhle Photo Rag.

Now moving to a new paper requires reviewing the original image in Photoshop and proofing it utilizing the appropriate paper profile. You may already know this, but there are multiple profiles for just one paper. There are profiles for daylight, tungsten, fluorescent, combined light, high contrast, phatte black...you get the picture. I have, over time, narrowed the profiles and papers down to the two I like the most. For me, it is vital to have at least two paper options, one luster and one photo rag, from which to select. It also goes without saying that the paper should meet all archival standards to guarantee years of enjoyment at the original color fidelity. It is important to have these options as you never really know what paper an image will really sparkle on and you get surprised sometimes like I did today.

Today was a perfect example of what a fine art photographer does. Sweats out the last detail until the image on paper looks the way he/she intended. It is amazing how good this print looks on the photo rag paper. I went from being totally discouraged to being ecstatic with a few minor adjustments to the original file and a switch to a more appropriate paper.

This is part of the value that a fine art photographer creates. I know that it can sometimes be hard to understand that value and my hope is that when you see my fine art prints that it becomes all too obvious that this is something more than just a file that was printed by a mass production print house.

Thanks so much for your support of Jeff Ball Photography and have a great day.

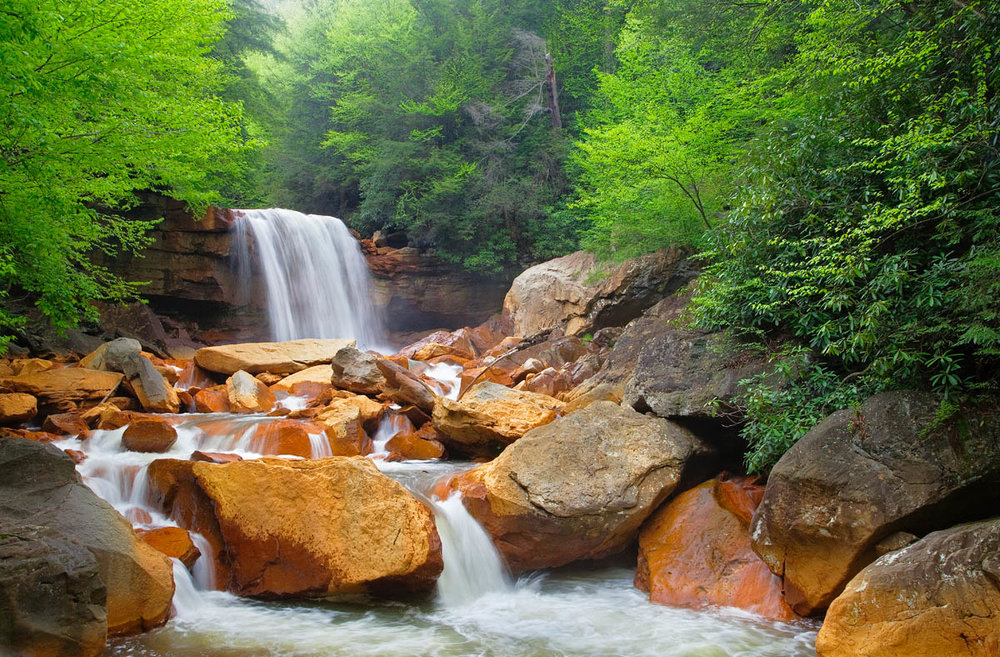
"Douglas Falls" added to "Water" portfolio

Douglas Falls, West Virginia, copyright 2010 Jeff BallSpectacular spring greens surround the colorful Douglas Falls in the highlands of West Virginia in May 2010.  The lighting condition were simply perfect on this day for this scene as there were high moderately thick clouds with just enough sun to provide highlights on the lush spring green foliage.  I also viewed a gorgeous Indigo Bunting while photographing in the area.  Spectacular West Virginia scenery in the spring of 2010.  Please don't forget to click on the image for optimum viewing in black portfolio window.  I hope you enjoy the image.  

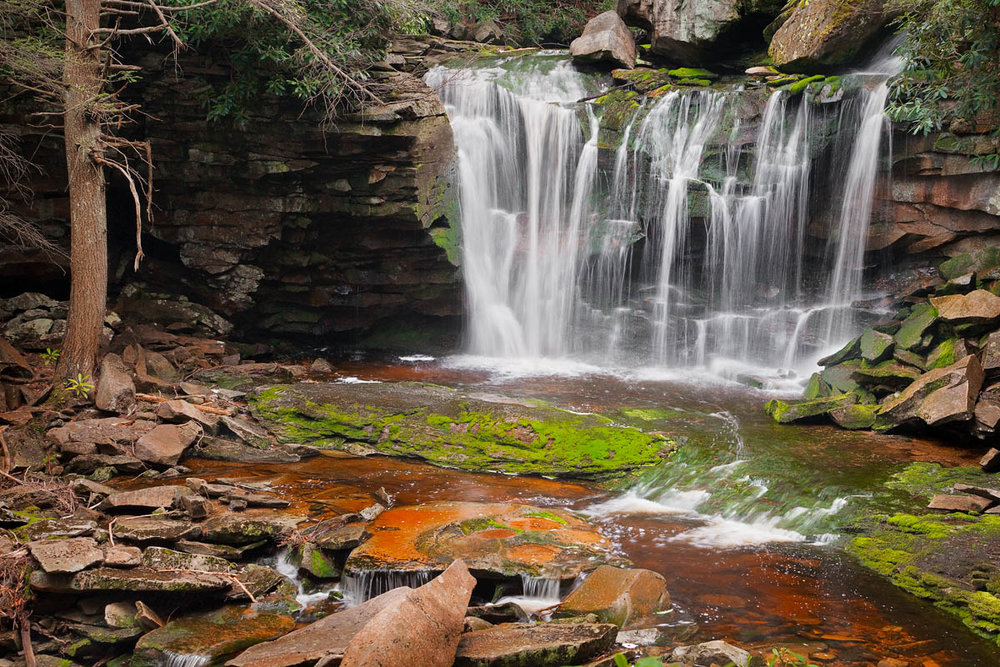
Elegant Elakala Falls in the highlands of West Virginia

Elakala Falls, copyright 2010 Jeff BallA new image has been added to the "water" portfolio of the elegant Elakala Falls in the highlands of West Virginia.  The image was taken during a brief spring shower with the Canon 5DMKII and 24mm tilt/shift lens.  The image is actually a blend of two images to maintain detail in the waterfalls.  I hope you enjoy the image and if you have any questions please don't hesitate to drop me an email.  Take care.  

New Print and Print of the Month Specials

Blackwater Falls, WVThe first image from Blackwater Falls area will be the first image of a new portfolio as well as the first image in the Print of the Month collection.  

The new portfolio will be "water" and will feature works that highlight the artistic beauty of water in nature.  I am very excited about this portfolio and have many other images to come.  

The Print of the Month is a very special offer for one frame and matted size print.  The print size is approximately 16x20 framed to approximately 24x28 and can very slightly depending on the image aspect ration.  The Print of the Month offers savings of 20% over the original retail price.  

The Blackwater Falls print is a compositional element I have been working on involving a "near-far" composition in landscape orientation.  Most near-far compositions have a portrait orientation, but for several reasons, I am exploring the landscape orientation especially in the forests of West Virginia.  

I hope you enjoy the print and please let me know if you have any questions   

New iPhone App for Photographers

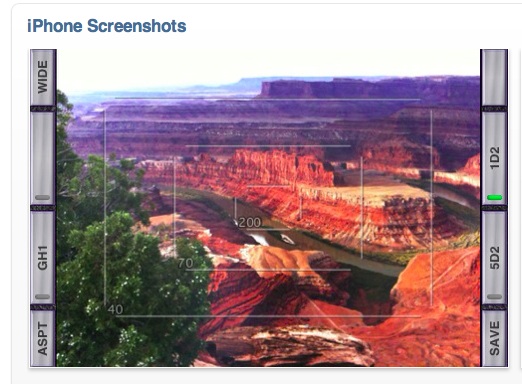
Viewfinder Standard iPhone AppIt may not always be convenient to have your camera and lens ready for judging a composition that presents itself in the field.  For those of us who utilized 4x5 or larger format cameras, we worked a bit slower in the field and utilized compositional aids to be more efficient.  I utilized a card board cut out in a 4x5 format and would hold the visualizer at varying distances from my eye to simulate various focal length lenses.  I also utilized a Linhoff visualizer tool with varying focal distances represented. These tools saved me from having to take out and setup the camera gear every time I thought I had a composition.  

Well now iPhone users have a very nice new tool to aid in visualization while in the field.  I normally have my iPhone on me so it is pretty convenient for me to access the camera, certainly more convenient than taking the camera out of the backpack every time I want to evaluate a composition.  And perhaps I am at a location without my camera gear?  Now I can use the iPhone app to capture the image and the desired focal length lens for a potential return visit with the gear.  

The app is called Viewfinder and comes in two formats, Standard or Pro.  The main difference is that the Pro version has pre-configured formats for medium format cameras and digital backs.  If you use a 35mm DSLR then the Standard is probably all you need.  The Standard version is $7.99 and the Pro is $14.99.  

As you can see in the image above, the app shows an overlay grid for varying focal lengths while you are viewing the live image on the screen.  You can click on one of the focal lengths to isolate that focal length exclusively in the view while the others are grayed out.  Setup is quite simple where you select the camera body you will be using and the focal lengths of lenses you want to have represented in the overlay.  You can also set the app to display a 16:9 format to aid in compositions for video capture.  

I see two primary limitations of the app: 

  1. The first being that the widest angle the iPhone can represent is 35mm equivalent of a 35mm DSLR camera.  Evidently there are some adapters you can attach to the iPhone camera to give a wider angle lens, but few utilize this and it seems to take away from the convenience of the device.  So knowing that you really can't visualize via the Viewfinder app any lens below 35mm is necessary in evaluating its effectiveness for you.  I don't find this a limitation at all since most wide angle compositions are pretty obvious and I need more assistance with longer telephoto compositions that isolate landscape rather than encompass landscape.
  2. The iPhone screen can be challenging to view in very bright daylight.  Now most of the time this isn't the best light to be photographing in any way, but you may be photographing in sunset light with the sun at your back and that may be challenging to view the screen.  Most of the time the viewing conditions will be fine for viewing the iPhone screen.

The Viewfinder visualizer looks like a wonderful new tool for photographers.  I expect to utilize it quite a bit in the field and hope to give it a hard workout on the upcoming field visit to the Great Smoky Mountains.  So far this is an early recommendation for the app.  Please let me know if you have any thoughts or ideas on the app.